Pages
Creative Vistors
Translate This Blog
Saturday, March 30, 2013
The Religious Meaning of Easter- For Kids

For those of us who are followers of Christ, Easter is in fact maybe the most important holiday of all. If you wanted to understand the Resurrection in more detail, I would suggest reading the Book of Matthew, which is the first book of the New Testament And also the beginning Chapters of the Book of Mark. The specific chapters where most of the important part are found in Matthew 27 & 28 as well as Mark 15 & 16. Of course Mel Gibson produced one of the most dramatic heart touching movies of all, The Passion of The Christ.
As a christian parent, I would not advise you allowing your young child to see that movie. It is VERY GRAPHIC. And I don't think that young children could even fully understand nor follow the movie. Its pretty long. But last year I made the decision that I wanted to bring back the true meaning of Easter. Now keep in mind, my children like all children love the Easter Bunny. I didn't completely eject him out of the equation. But for their religious curiosity, I had to find a way to explain the Easter story in a more kid-friendly manner. Last year I found the perfect solution on You Tube of all places!!!!
Events Leading Up to the Easter Story
Easter Story Animated Part 1 of 3
Easter Story Animated Part 2 of 3
Easter Story Animated Part 3/3
Wishing you all a blessed Easter Season!!! Comments are appreciated and always welcome.
UPDATE: After searching YouTube...I found one video of all four parts put together!
How did I miss this before? O_o Enjoy :D
Sunday, March 24, 2013
DIY Bunny Basket
Easter is almost here!! I can believe it. Well maybe because the weather here has been a tad bit on the freezing side! But any hoo, I wanted to make the kiddos baskets this year. Like actually make them. I usually just buy Dollar Tree baskets and fill them with goodies. This year I wanted to make something they could hold on to for a couple of years. And who knows maybe give to there children :D. Here is an easy peasy tutorial on creating your very own Bunny Basket!!
SORRY ABOUT THE ALIGNMENT OF PHOTOS. THEY ARE FINE IN DRAFT BUT ARE MISALIGNED SOMEHOW O_o
What you need:
1 weaved basket (rectangle or square is best but round will do) ($1 Dollar Tree)
1 Styrofoam ball ($3 Hobby Lobby)
2 Packs of Jumbo Loopy Chenille (doll accessories) ($2.99 ea Hobby Lobby)
6-6mm 12in Pink Chenille ($0.87 Hobby Lobby)
3-6mm 12in White Chenille ($0.87 Hobby Lobby)
2-35mm Wiggle Eyes ($0.99 Hobby Lobby)
1-2 1/2 in White Pom Pom (3 for $0.99 Hobby Lobby)
1 Felt Shape Sticker (pink heart)
1-Super Jumbo Craft Stick
Hot Glue Gun and Glue Sticks
White Paint
Paint Brush
Scissors
Hot Pink Hair Bow for Girl
or Blue Bow Tie for Boy
Step 1 Paint
Paint your basket with white paint. I started using acrylic paint from Hobby Lobby but it was not white enough. I ended up using Behr Premium Plus Ultra Pure White UL200. If you do get the Behr get the paint and primer in one. I just got a sample sample jar. $3 from Home Depot. Paint two coats. Let paint dry between coats. Be sure to paint along the grain of the wood. Which is the lines in the wood. So either left to right or up and down. Depends on your basket. Set basket aside. Paint your Popsicle stick as well. two coats. Set aside.
TIP (you can insert the popsicle stick in basket during this step and just paint over it)
Step 2 Head
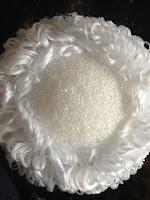
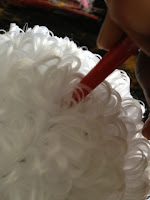
You can start by plugging in your hot glue gun. Keep sticks near by. Starting from the bottom wrap the jumbo loopy chenille around your Styrofoam ball. I used a 5 in ball. If you need to, use straight pins to hold the chenille in place. At this point you are just measuring. Once you have completely covered the ball all the way to the crown, cut off the excess. Be careful cutting the chenille. Its curls will stray if you cut them. Try to cut the wire. Once you have measured the right amount of loopy chenille, unravel to the beginning. Using your hot glue gun, glue the chenille to the ball. Pressing firmly will ensure that the chenille will be secure. Set aside.
| Cut off excess |
 |
| Hot glue a little at a time |
Take one pink pipe cleaner and fold it in thirds. Carefully hot glue the pipe cleaner together. Take the next pink pipe cleaner and hold in half. Hot glue it to the outer edge of the folded pipe cleaner. Take the last pipe cleaner fold in half and glue to the outer edge of the halved pipe cleaner. Twist the bottom of the pink pipe cleaners to secure. Repeat for second ear. Measure 2 pieces (13 in long each) of jumbo loopy chenille. Hot glue the jumbo loopy chenille to the outside of the pink pipe cleaners. Twist bottom of loopy chenille to secure. Repeat for second ear.
Step 4 Ears and Head
Using the point of the paint brush, poke a hole in the top of the head for the first ear. On the bottom tip of the ear place a few drops of hot glue and immediately insert into hole. Repeat for second ear.
Step 5 Face
Whiskers-Take three white pipe cleaners and twist at the middle. Place a drop of hot glue on the center of pipe cleaners and place the pink heart sticker without removing the backing. Add more hot glue to the back of the heart sticker and adhere to the center of the bunny head. After hot glue cools, trim the whiskers to a length of your liking. You can now hot glue the eyes to the face. Set head aside.
Step 6 Secure Head to the Basket
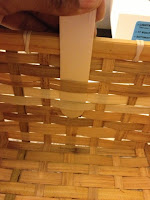
Take a plain popsicle stick and weave in and out in the inner backside of basket. Be careful not to crack the basket. Note how much of popsicle will he above the rim of the basket. This is the amount that you will need for the head. Make a mark and remove. Carefully turn head upside and slowly push popsicle stick inside head to mark. Remove. Now you can take your white painted popsicle stick and insert into the same spot as before. Add hot glue to the front and backside of popsicle stick and immediately place head on popsicle stick. Hold the head for a few seconds to allow hot glue to cool.
Measure about 42 in for the arms and shoulders. The arms need to be doubled up along the edges of your basket. Its easier if you twist the ends to secure. Hot glue the shoulders to the back top edge of basket just under the head. If you have a handle that moves, make sure that it is in the upright position. Glue one arm at a time.
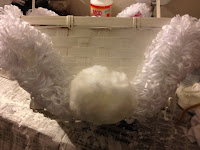 Now for the feet. Cut 2 10 1/2 in strips of loopy chenille for the feet. Take one strip and fold in half. Twist bottom then fold upwards to secure. Repeat for second foot. On the side where you folded the bottom of chenille upwards, apply adequate amount of hot glue and place on front of basket at a slight angle. Repeat for second foot. Glue your pom pom at the bottom between the two feet. Add your bow and your done!!
Monday, March 18, 2013
It's in the Bag!

Someone once said, "You can tell a lot about a lady by whats in her purse." Well I so believe that's true. Sometimes as women we tend to over stuff things. From foundation to lip gloss, and binkies to diapers, our purses can definitely tell a lot about us. But what should we actually have in our bags? Have you ever actually thought about what the necessities are? Well it finally dawned on me one day on a family outing when I couldn't find my iPhone!!! Of course it was in the bottom of the bag buried by old receipts, chocolate and change. That was the last straw. When we got home I dumped out my bag on my bed shocked by all the junk that I kept in there. LOL. Being a mom made it worse. I had snack size gold fish, band-aids, Neosporin, stickers and Dum Dums. On top of that I had my own things in there. To make a long story short, I knew I had to really clean that darn bag out!!!! So I thought and thought about what actually needed to be in my bag.
Well here's the break down:
(You don't have to take everything in the categories just whatever applies to you)

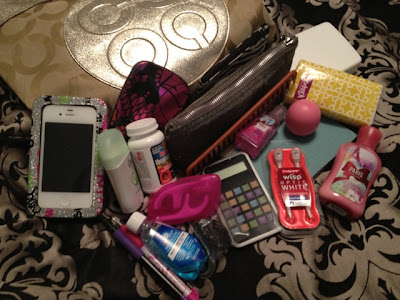 |
| I-Phone case/wallet-Wet Seal $3, Kotex Purple & Black Tin- Wal-Mart $1 Dentex Flosser Case-Walmart $3 free bonus carrying case White Johnson & Johnson first aid kit-Family Dollar $1 |
Toiletries:
- Mini size Kleenex (you can get them in the trial section just about everywhere)
- Hand Sanitizer (None other than Bath and Body Works-Don't you just love the scents!!)
- Colgate Wisp (these can get expensive so you can opt out or stick to the trial size toothpaste and tooth brush)
- Floss (I hate when I go out to eat and get something stuck in my teeth!! I prefer the floss picks I even got a handy mini case for them)
- Trial Size Mouthwash
- Mini Deodorant (trial section you never know when you made need to freshen up)
- Mini body spray/perfume (roller or pump)
- Small bottle of lotion (doesn't have to be fancy-who likes dry hands?!)
- Cleansing Facial wipes (Not year round-I need these during the Spring for pollen and sticky hot Summer Days)
Feminine Products: A Must have!!!
- Panty Liners (you know where to get them! Did you know Kotex has a cute discreet case for them now!! $1 at Wal-Mart)
- Tampons/Pads (whatever floats your boat-you don't have to keep these in there but its nice to be able to help a friend out if need be)
 Grooming:
 - Small comb
- Hair Brush
- Bobby Pins
- Hair Ties/Headband
- nail clippers
- Nail file
- Small bottle of hair product (in case you need it-being natural its a must have!)
This can be tricky...if you use primer you really wont need to keep anything in you bag unless your going to stay until the sun rises ;D
- travel size make-up brushes, q-tips, or eye shadow applicators
- lip balm (my choice is ESO it's cute small and really works!!)
- eyeliner
- lip stick
- small eye shadow
- mascara
Things You So Probably Leave Out:
- Open food (if you every drop your purse and you have an open bag of chips or something it will just make a mess at the bottom and of course your hair brush!)
- Nail Polish (the bottle can break usually when its too hot... don't ruin your good bags)
- Of course anything without a secure top (prevent spills)
- Your whole collection of makeup (keep it simple take what you need)
Thursday, March 14, 2013
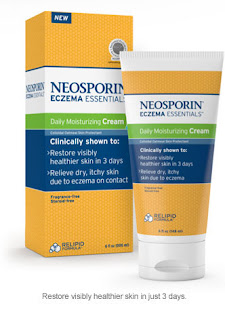
Treating Eczema using Neosporin Essentials Daily Moisturizing Cream
Anyone who has kids with eczema knows that once an episode gets bad, it hard to get under control. I found myself this winter trying everything in the book. My daughter Mya (5) has eczema which normally is okay with the exception to cold weather and pollen. This winter was pretty bad for us in Omaha. Her eczema got so out of control it would bleed. I tried the prescription strength hydrocortisone, over the counter hydrocortisone aloe vera, coca butter, and everything else. Her eczema just wouldn't respond to anything. I began to worry because her scratching led to bleeding which left dark spots. I didn't want to waste anymore money on prescriptions and over the counter hydrocortisone.
I came across Neosporin Essentials in Walmart. I saw it was new. I read the label and decided to give it a try. I had just about lost hope. Neosporin is great for preventing scars so I was sold. After my daughters bath, I applied the cream on her head to toe. Literally in a matter of minutes, I noticed how moisturized her patches and overall skin was!! I was very surprised. Then in about three days I saw a dramatic difference. First sign was that the scratching stopped completely. The cream literally calmed the eczema down. This cream is definitely a God send! Of course $11 can get expensive rather quickly I can tell you its really worth it. Even Aveeno didn't do as great of a job as this cream! The cream was so gentle that I used it on my 19 month old. He was beginning to develop eczema with the dry rough patches of skin. After two days of use, his skin was back to baby bottom smooth!! I am so happy I bought this cream and I definitely will continue to buy it.
Sunday, March 3, 2013
Happy Birthday Dr. Seuss!
So it was the time of year again. Spirit week. Oh how I dread
spirit week. Of course my son reminded me day after day that he needed to dress
up for Dr. Seuss Birthday. He wanted to be the Lorax. With five days to go I said
absolutely not. It would take me a week to even get a chance to think about how
I would begin that. So I pondered on what he could do instead. I first said Cat
in The Hat, but everyone does that. We went with Things 1 & 2. I have three
kids not two and I can’t do for one that I won't do for the all. I realized it
would be so darn cute for the three of them to dress up together. After all,
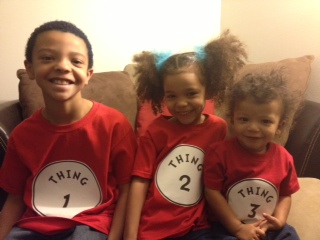
they are only this small once. Here is a picture of the completed look.
For the tutorial on creating the decal
itself, check out my post in DIY Fabric Transfer (Things).
First here is a list of what you need:
Red T-Shirt (100% cotton)
Fabric Transfer Paper
Printer
Plain Printing Paper
Computer with MS Word (or any word document software)
Iron
Scissors
BEFORE WE BEGIN TURN ON YOUR IRON NOW…Highest NO STEAM
setting
DECAL
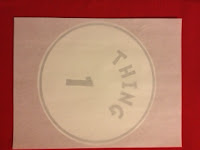
On word create decal of Thing 1 and Thing 2 (and don’t
forget 3 ;D ) Or you can download and print my template HERE. (The link will take you to my DROPBOX account to download. DONT WORRY about how the template looks in Drop Box...It will look normal in MS Word after download). If you are
creating your own, print a few practice sheets on plain printing paper. That
way you won’t waste any of your transfer paper. You can download the font I used thanks to Font Space HERE. Once you have edited the sizing and wording to your liking you can print
it on your transfer paper. I bought my transfer paper from Wal-Mart for $7 for
three sheets. Hobby Lobby had them for $14 for 3 sheets. Cut out your circles
leaving a tad bit of white around the edge. (Please note that whatever you cut
out will be on the shirt. So cut exactly as you want it to appear on your
shirt.) Set aside.
T-SHIRT
Before you can transfer the decal, you need to iron your
shirt where you will be placing the decal. This is to ensure there are no
wrinkles under your transfer. Let shirt
cool.
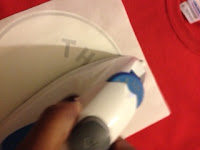
Now you need to peel the backing off the decal SLOWLY. Pulling to fast
can tear, wrinkle, or somehow damage the transfer decal. Position decal. Place
the parchment paper from your fabric transfer pack on top of the decal.
(Please
note you need to apply a good amount of pressure, also ironing on flat surface
can help to ensure there are no wrinkles. I used my pattern cutting board.
Ironing boards usually have holes that may leave imprint on shirt. Ironing mats
are also good to use.) Iron for 25-35 sec depending on the size of the decal.
Leave parchment paper on top of decal while it cools.
After cool down you can
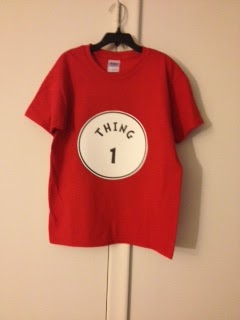
remove parchment paper. (If you notice wrinkles or lifted edges, iron again
with more force). Hang on a hanger until you are ready to wear. To wash, turn inside out and air dry or tumble dry cool. Always iron decal with parchment paper.
Thanks for the support! Feedback and comments always welcome
:D
DIY T-Shirt Decal/Transfers (Things)
Directions for Dr. Seuss' Thing 1 & Thing 2
You have seen them everywhere. Many malls have kiosk that make them. Of course for an outrageous price. I need a Thing 1 shirt for my son, so went to my local mall. There it was. Right by the food court. The t-shirt making kiosk. I asked the young teenager how much the t-shirts were...$20, $15 with your own shirt. Now keep in mind, this was a child size I inquired about. You have got to be kidding me. Clothes are already too expensive let alone a t-shirt kiosk that just irons on these cute little sayings. Im in the wrong business seriously!! Of course I knew my only options were to buy the expensive shirt, or make it myself. Well of course I made it myself. (You can check that out in the Just For Kids section). Here is a tutorial on making these decals using mostly what you already have access to:
Things you need:
Computer
MS Word (or any document software)
Printer
The Easy Peasy Steps
Open MS to create a new Word Document.
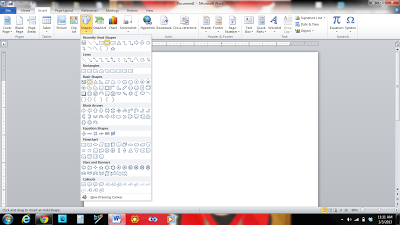 |
| Go to your Insert Tab-Shapes-Basic Shapes- and select Circle |
 |
| Draw your circle shape. Ctrl+S to save. Name your document. |
You can never save too much. After loosing my work on a high school essay many moons ago...lesson learned. I save very often :D
 |
| The Format Tab should open automatically. Select Shape Fill-No Fill. Then select Shape Outline-Weight-More Lines. Ctrl S. |
 |
| You can choose a value for the thickness of your line. I chose 10. Ctrl+S. |
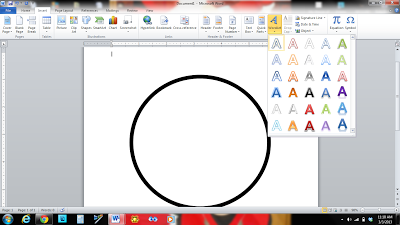 |
| Go to the Insert Tab-Word Art-And choose any style you like. Type the wording of your choice. Ctrl+S. |
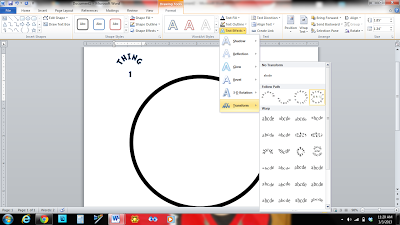 |
| Go to the Format Tab-Text Effects-Transform-Follow Path-Button. Ctrl+S. |
This will allow your wording to round or type in a circle.
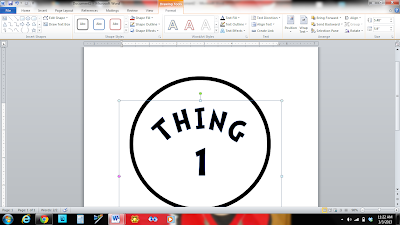 |
| Lastly you can change the font size to fit your shape. Ctrl+S. |
After saving you can print to see if you need to make any changes. Don't worry about centering the shape itself because you will be cutting it out anyways when you print on the transfer paper. Print on plain printing paper as much as you need to. That way you wont waste you transfer paper.
Subscribe to:
Comments (Atom)
